kneelingatlas
-
Posts
8,154 -
Joined
-
Last visited
Content Type
Forums
Profiles
Events
Store
Everything posted by kneelingatlas
-
An important part of the polishing often neglected is polishing the corresponding parts of the frame where the moving parts touch and the insides of pin holes; this can be done by rolling fine sand paper and pulling it through the pin holes. The hammer pins are sometimes staked and very difficult to remove so a starter punch can be helpful.


-
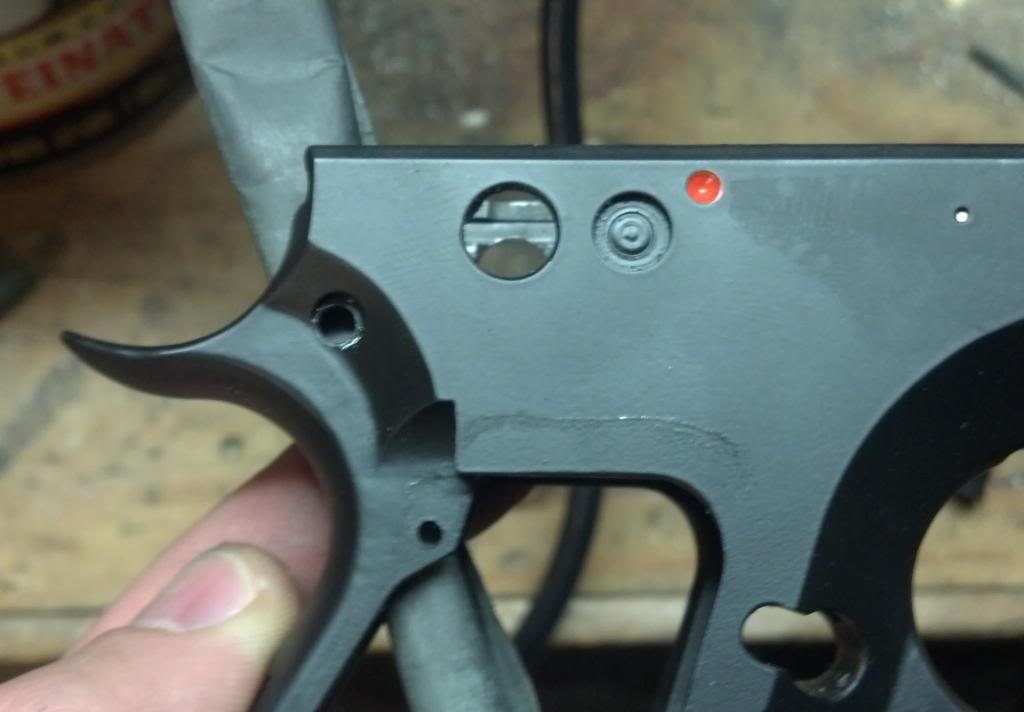
The pin connecting the trigger the trigger bar should push right out without hammering. On the back edges of the trigger bar there are four bearing surfaces: -the inside two are where the disco breaks the DA shot -outside left (top in picture above) is where the single action shot breaks at the sear -outside right (bottom in picture above) is where the firing pin block lifter is activated These surfaces can be lightly polished, but removing metal will change the 'timing' of the action (more on that in the advanced class...) This is the surface where the trigger bar rubs on the bottom of the sear cage and should be polished, as well as the top humps where the bar contacts the slide. The sides of the trigger bar rub on the sides of the frame and should be polished. on the bottom of the trigger bar you can see where it touches the frame and where the U shaped spring rides.


-
The trigger return spring will go flying when you pull the punch out, so cover the top of the frame with your hand as you pull it out. To change the mag release you must remove the screw holding the trigger bar lifter spring, this screw may or may not be staked and can be very difficult to remove, so use a screwdriver with a tight fit and maintain constant downward pressure while turning.


-
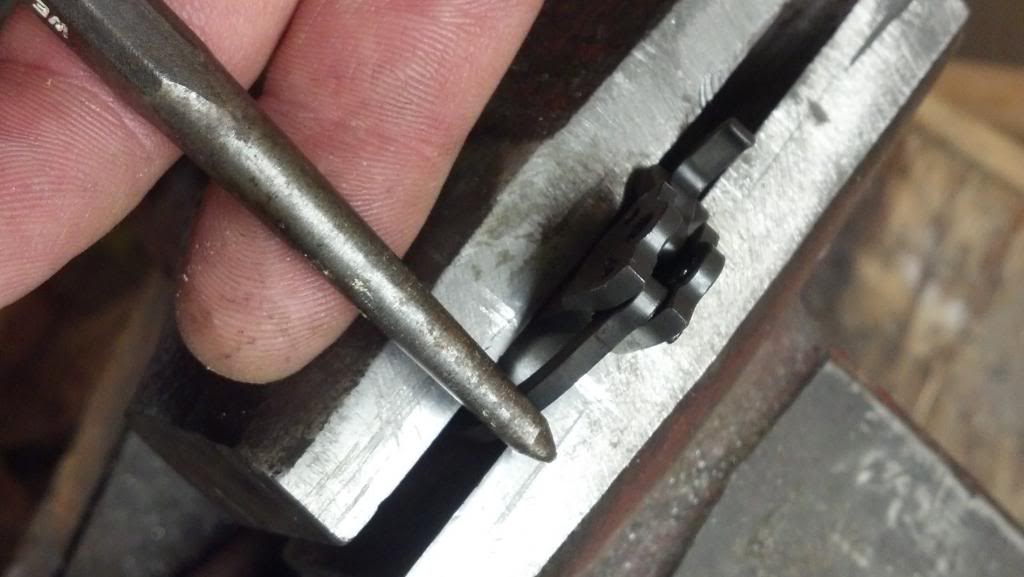
Hammer pin removal: using a jeweler’s screwdriver to push the retaining pin up out of the path of the hammer pin, then push the hammer pin out right to left. Remove hammer, strut and disco: Polishing the hammer strut (red line above) can improve the smoothness of the DA stroke as this is where the hammer spring compresses. Punch out the trigger pin starting on the end with less flare:


-
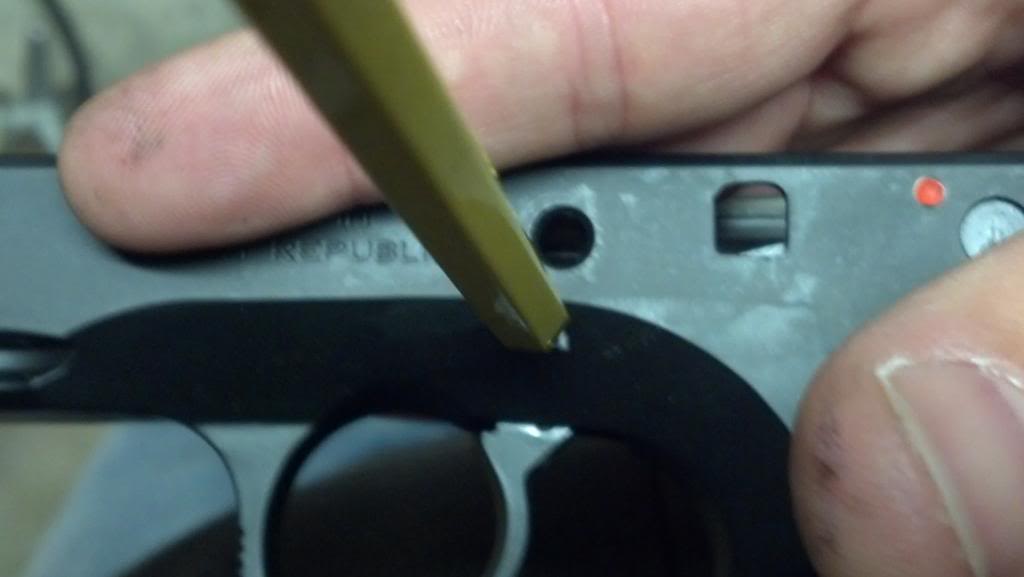
then use the same screwdriver the depress the spring loaded detent on the left hand side and push the left hand safety out to the right. Pull the sear assembly forward to remove it. Be mindful of the safety detents in the frame; the right detent simply sits in a groove in the frame while the left one is under spring tension, set them both aside.


-
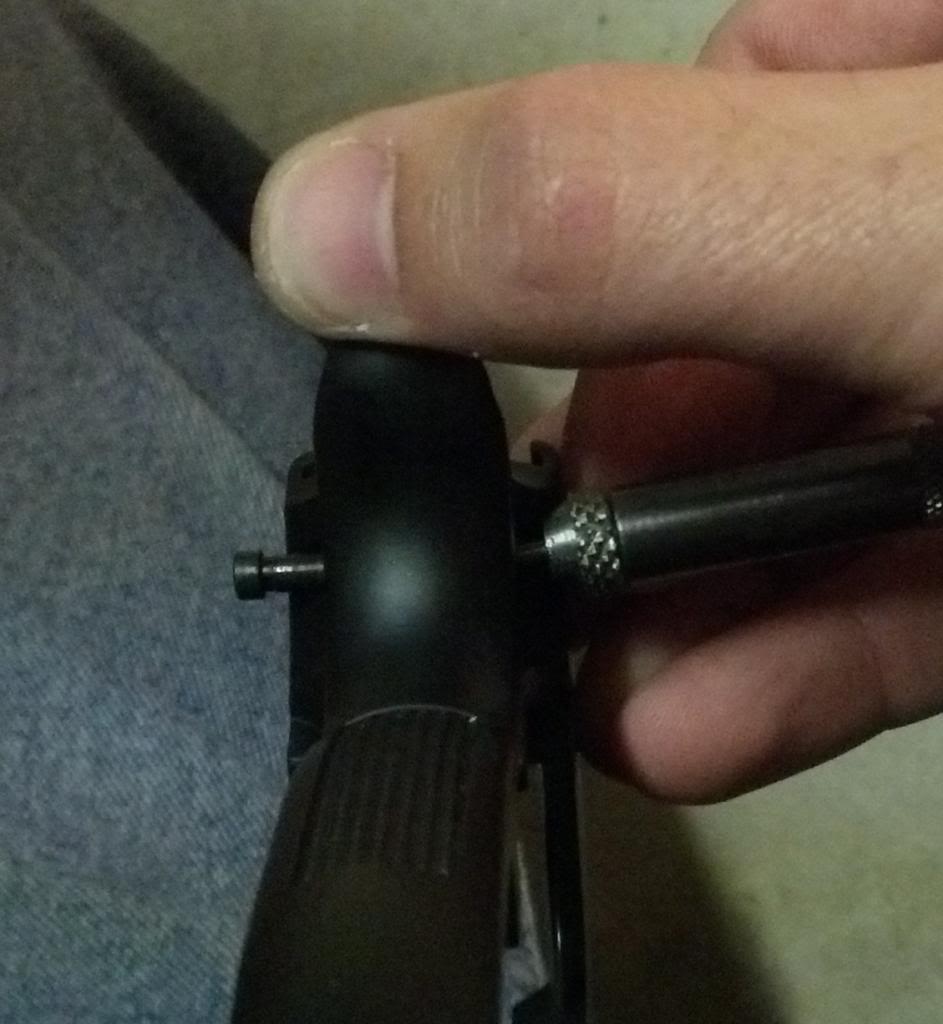
Now to the lower half of the pistol: I will install CZ USA's race hammer, a Shadow mag release, 97B trigger (the same as the old style 85C trigger, but without the over travel screw), a flat hammer spring plug, and the following CGW parts: 11.5# hammer spring, reduced power trigger return spring and type one short reset disconnector. Step one: remove the grips. Next depress the hammer spring plug slightly and remove the retaining pin. Then remove the top retaining pin on the magazine brake and remove the brake. Removing the safeties: using a jeweler's screwdriver, lift the long leg of the sear spring out of the groove and set it aside on the safety.


-
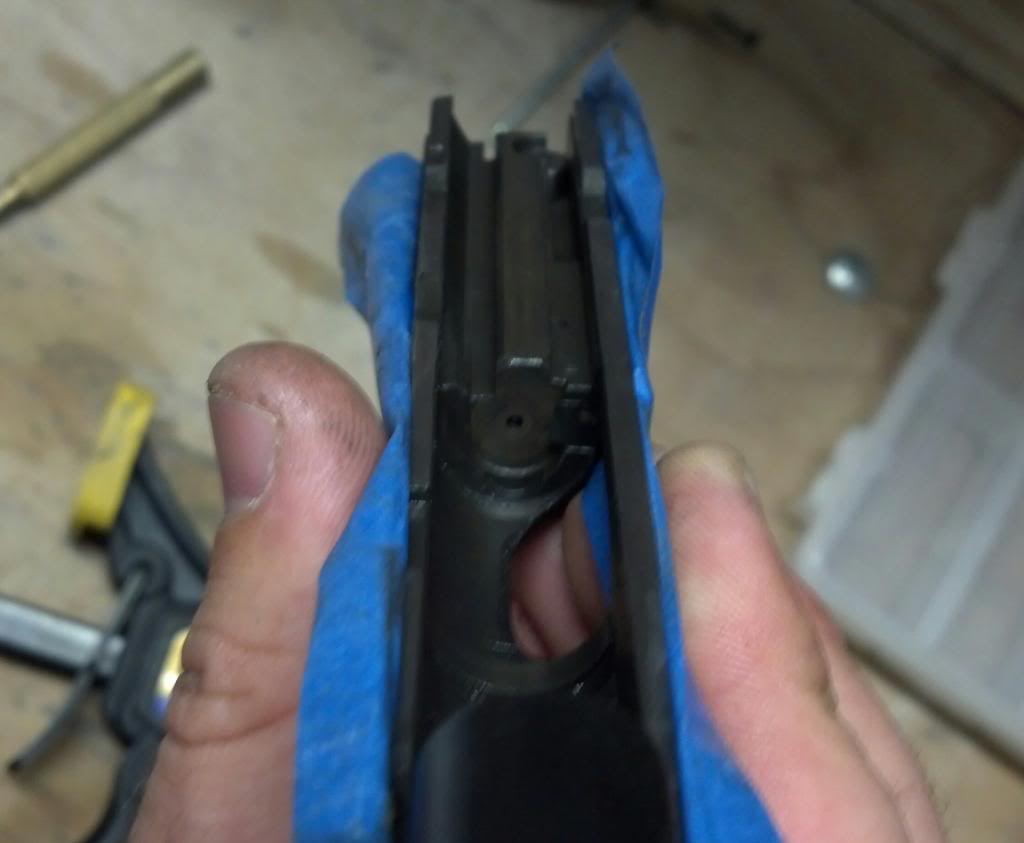
I use masking tape to protect the polycoat then clamp the slide to a sturdy bench top or saw horse and pound out the roll pin which retains the firing pin. You will feel the firing pin pushing on the punch once the roll pin has cleared the channel. I try not to drive the roll pin clear out of the slide so it's easier to put back in. Once out I polish the channel with a rolled up piece of sand paper (1000 grit or finer) and I will spin the new firing pin in a drill or drill press, using sand paper to polish it as well. I place my sand paper on a folded towel to polish parts which are not flat nor round like the firing pin block. I also lightly polish the hole where the block goes. *When polishing metal parts smooth is the goal, if you remove too much metal you can ruin them so I don't suggest using and sand paper coarser than 500 grit* When the pistol cycles, the leading edge of the slide must fight both the hammer spring and the recoil spring at the same time; to round this edge is the reduce the initial force required at the beginning of the slide stroke, reducing muzzle flip. Other things can be done here that I didn't do: polish the breech face, chamfer the firing pin hole and soften the bottom edge of the breech face to reduce the slide dragging on the top round in the magazine on its way back. None of the work detailed in this thread is 'necessary' to the function of your CZ pistol, so you can certainly prioritize your time spent tinkering, or do these mods in steps if you prefer. Reinstall the firing pin, then the firing pin block and lastly the barrel/recoil system.


-
Then I went to work: Pull the slide slightly back until the take down marks line up at the back of the pistol then push the slide stop out from the right side. The top end then slides off the front of the frame. Remove the guide rod, recoil spring and barrel. I will be installing an extended firing pin, reduced power firing pin return spring and reduced power firing pin block lifter spring, all from Cajun Gun Works.


-
There are quite a few resources out there for us shade tree gunsmiths to work on our CZs, most notably this epic thread (http://www.czfirearms.us/index.php?topic=42537.0) I have linked to many times by David Milam of Cajun Gun Works. While tuning up a brand new SP01, I decided to take a stab at a comprehensive beginner's guide to these great pistols; my hope is that this thread will spark discussion and collaboration so that collective knowledge of this forum can create something really useful for new CZ lovers. The tools: I prefer a heavy hammer because it will deliver high energy blows without swinging it too hard (less effort = more control); you can cut down on "idiot marks" and other collateral damage when you swing the hammer with less effort. Because the pins in my Brownells set are too short for some applications I use these basic punches as well: although it looks like Brownells is now selling longer pins: http://www.brownells.com/gunsmith-tools-supplies/general-gunsmith-tools/punches/gunsmith-replaceable-pin-punch-set-prod545.aspx The replaceable pins are nice because punches do bend and they do break. You'll see I also use Quick Clamps with rubber boots which do a nice job of clamping the frame/slide down without marring the finish. By nature polishing metal is about removing metal, but the key is to remove very little amounts of metal at a time; I use a power sander with 1000-2000 grit sandpaper on flat parts and a felt wheel with automotive rubbing compound on those 'hard to reach' spots. As we become intimately familiar with our pistols, it's easy to become lax on safety, so I began by clearing the pistol. I tested the trigger pull for a baseline:


-
26
-
The big stick holds 30 reloadable with the ten coil spring, haven't had the stones to try it in a match to see how reliable it is though...
-
 Very cool, make sure to share his name if you're happy as well
 -
Best platform for .22 conversion?
kneelingatlas replied to thrlskr's topic in "Other" & Pistol Comparisons
I've owned both large frame and small frame EAA Witness .22 conversions and sold them because I couldn't get them to run well with my lightened hammer springs. I since learned a few things and plan to give them another shot. I'll keep everyone posted in the Chop Shop. -
Nobody ever told me I needed that sutff!?! I've been using a hacksaw, heavy rock and finish nails!
-
This is the holster I use for my Tanfoglios: http://www.shootersconnectionstore.com/CR-Speed-WSM2-Holster-Tanfoglio-RH-P2225.aspx As for magwell, the frame above is not a "competition frame" which the is designed to accept a mag well, but one could be fitted to it. Does it have a main spring plug on the bottom like a CZ? If it doesn't you could drill/tap the frame and bolt on Henning's mag well for small frame: http://henningshootsguns.com/shop/frameparts.html This is my small frame Open gun: If it does you could use CZ Custom's mag well for the 75B: http://czcustom.com/cz75magwellidpa.aspx I put the CZC mag well on this Mossad:
-
-
I've been down this road... use 9mm mags. In theory it makes sense, but in practice I didn't actually get more capacity and the feed lips would never stay where I bent them and rounds would fly out the top. Give it a try, I could only get 23 rounds of 9 in my 141mm 40 mags, but I also get 23 in my 9 mags.
-
EAA Compact L - alloy & tritium night sights
kneelingatlas replied to Hi-Power Jack's topic in Tanfoglio (EAA / IFG)
I'll be damned! None of them will. My first DA Witness had a loose safety and would, I guess I just assumed they all would. There's that saying about assumptions... -
Nope, the same.
-
That's some good stuff JB, I just thought of another possibility: if your over travel screw is dialed in too tight the half clock hooks could be catching on the sear on its way forward. Hold the trigger all the way to the rear and work the hammer with your thumb and feel for contact with the sear.
-
I would be willing to bet someone at the club where you shoot has a moon clipped revolver you could try for a match or two. It's easy to get into the habit of "buy it just to try it", but that's definetly not the most efficient way to do things; just remember to give more than you take and you'll be a popular guy
-
EAA Compact L - alloy & tritium night sights
kneelingatlas replied to Hi-Power Jack's topic in Tanfoglio (EAA / IFG)
Very interesting... I'll have to check mine when I get home. -
EAA Compact L - alloy & tritium night sights
kneelingatlas replied to Hi-Power Jack's topic in Tanfoglio (EAA / IFG)
Hammer down and safety on??? Most CZ pattern pistols will fire in DA with the safety on. -
EAA Compact L - alloy & tritium night sights
kneelingatlas replied to Hi-Power Jack's topic in Tanfoglio (EAA / IFG)
If you're looking into alloy frames you might look at TriStar (Canik) which is a Turkish made CZ variant; I really like my full size. -
That's good, if you can't get satisfaction from the seller PayPal will allow you to do a charge back. I suggest you start with the seller, then escalate to GunBroker and PayPal if necessary.