


ACree
-
Posts
140 -
Joined
-
Last visited
Content Type
Forums
Profiles
Events
Store
Posts posted by ACree
-
-
To be quite honest, I just looked over the two JEM frames I'm working on right now and if it wasn't for the fact that guys I look up to use them, I would send them back. There's just a lot of work that has to be done to these frames in areas that other frame manufacturers don't have. Case in point, the top of both of the magwell in these frame have deep, vertical lines gouged in them that show up on the frame rails. I will be filing and stoning for quite a while to fix that issue.You know, we rave about JEM frames, but they are a lot of work to prep. I have a couple right now that will take quite a bit to get in usable condition. Tools marks galore.
Sent from my SAMSUNG-SM-G900A using Tapatalk
-
You know, we rave about JEM frames, but they are a lot of work to prep. I have a couple right now that will take quite a bit to get in usable condition. Tools marks galore.
-
8 hours ago, zzt said:
Next time don't start with an STI slide (or frame for that matter). Start with one that was surface ground flat before any machining was done. You will find they are much more precise. Caspian for slides (not frames) comes to mind, as does JEM for frames and slides.
ZZT, I have found Caspian slides to be the worst so far - their frames are no better. I Have had good results with STI slides and as have others. The amount of material that was removed with the granite plate was likely in the .001 range, but enough to need attention for a polished blued finish. The STI slides are surface ground as well, which was evident by the appearance of the metal surface. Grinding before or after heat treat - maybe that is some of the issue, but I would not know. I will give the JEM slides a try since I have been using their frames.
Eric - any plans on L10 slides in the future?
-
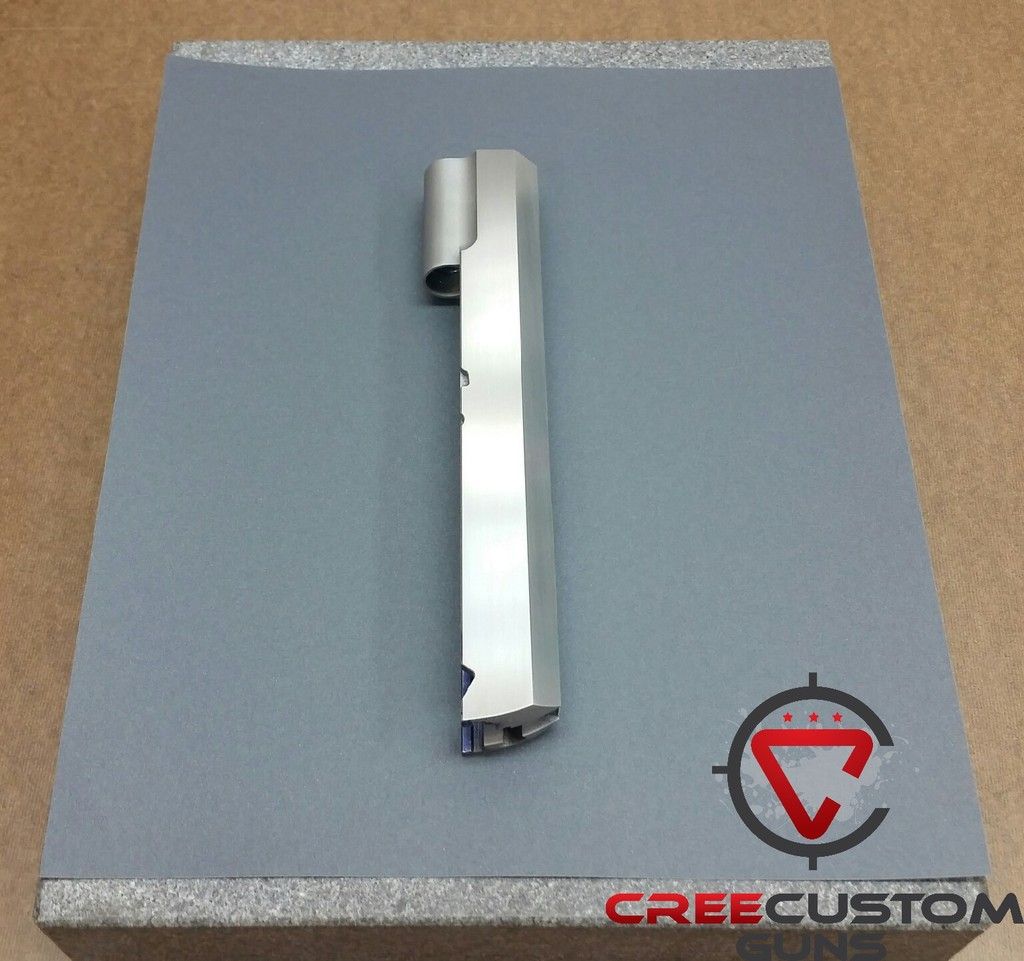
My kingdom for a surface grinder.... spent quite a bit of time at the granite plate making sure all of the slide's surfaces were flat. It would surprise some of you what can be hidden by the manufacturer with a bit of media blasting. This is an STI slide and overall it was decent. I stopped once the surfaces were straight and flat. I still have a lot of machining to do on this slide, so there is no use to go any further at this point. The owner wants a polished finish which will require a lot more work later on in the build.
-
BBG,
The raised portion you are referring to in the second picture is to provide some clearance between the bottom of the slide and the dust cover and even the integral plunger tube housing. You do not want the bottom of the slide rubbing along the top of the dust cover or the plunger tube housing. It looks really cool then the slide melts into the frame (especially the full-length dust cover frames), but this is not a good thing. It also is extra material in case you need to re-cut the frame rail to open it a bit to accept the bottom portion of the slide rails.
In regards to the question you are asking about removing material from the bottom of the slide, I would suggest mapping out all of the measurements for the frame and slide rails first if this hasn't yet been done. Those measurements will help you, as help us, to tell you where to begin to remove material. I have attached a pretty common slide and frame measurement sheet to help out if you do not already have one.
Andy Cree

-
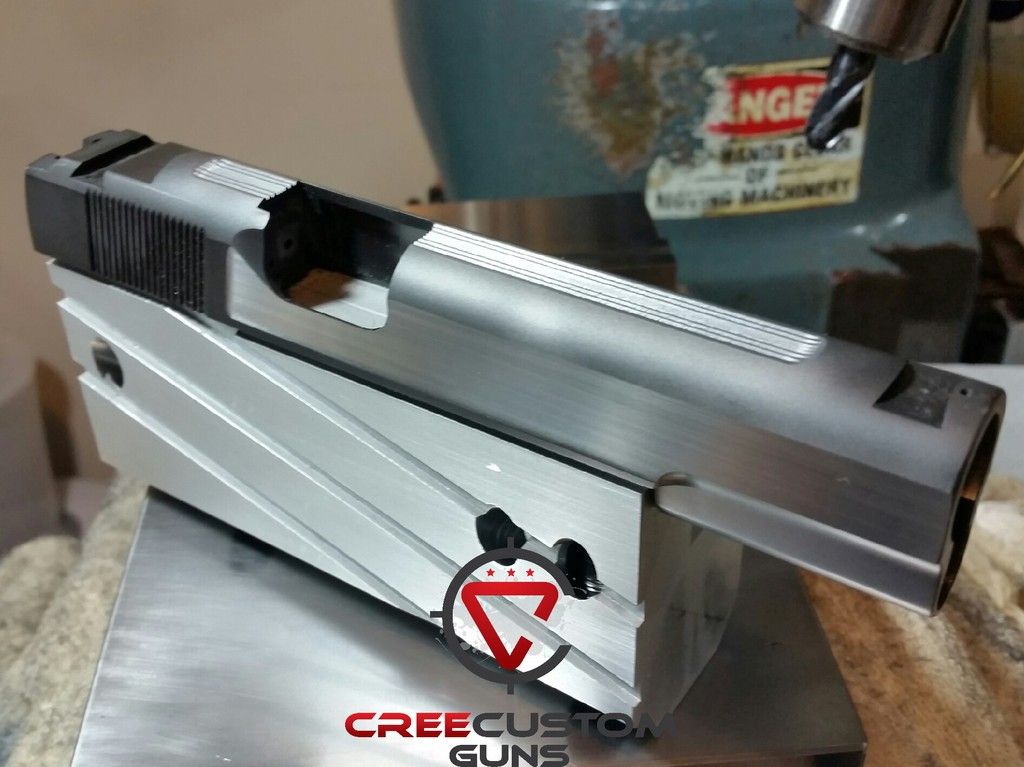
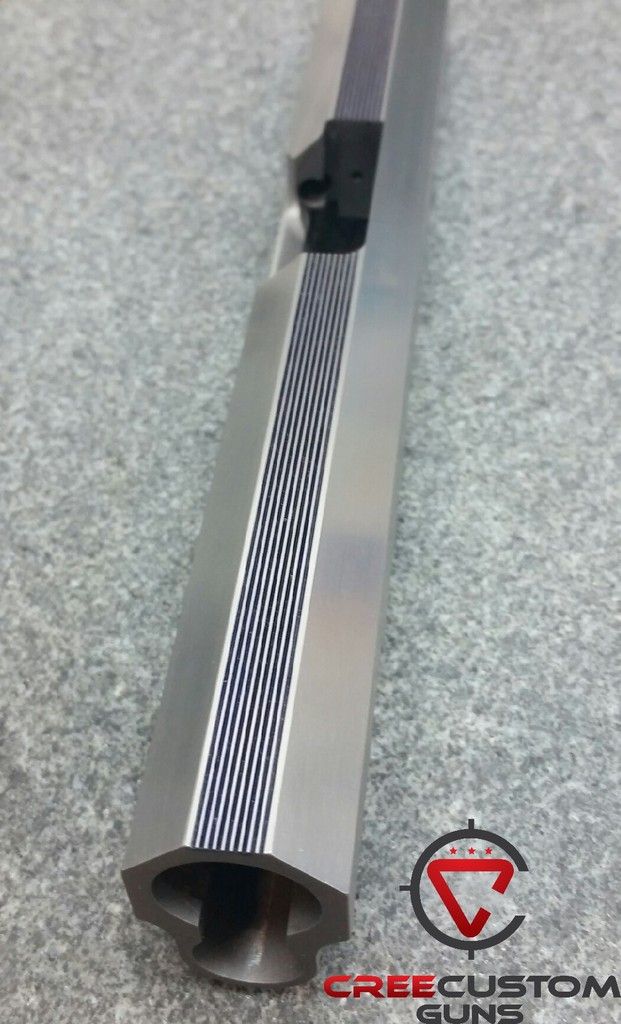
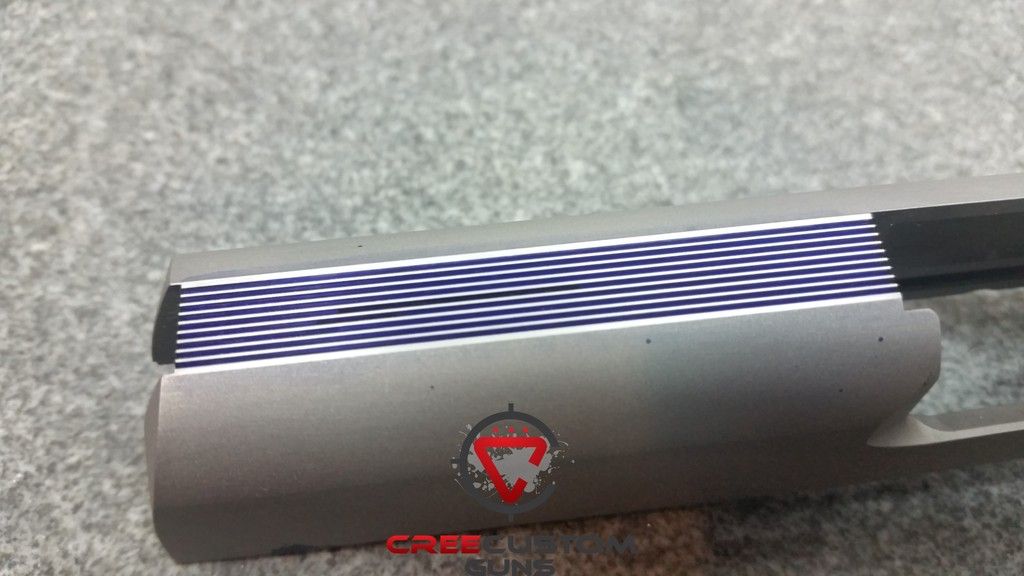
I needed to get some other mill work done while the head was in tram, so this custom slide had to wait an additional week or two to be completed. "CCG Racing Stripes" on the flat top, ball cuts, and removal of the manufacturer markings on the side with a slight shelf left.
-
Eric the L10 products are awesome and your work is impeccable. L10 frame for a build I have coming up soon! Can't wait to get my hands on the L10 frame!
Sent from my SAMSUNG-SM-G900A using Tapatalk -
Have some other work to complete during this build, like installing this "gas pedal" from GoGun. Also have to fit a new barrel in another 1911 as well. Pics to come.
-
3 hours ago, Broncman said:
CCG that is super clean! Nice.
Thank you Broncman!
-
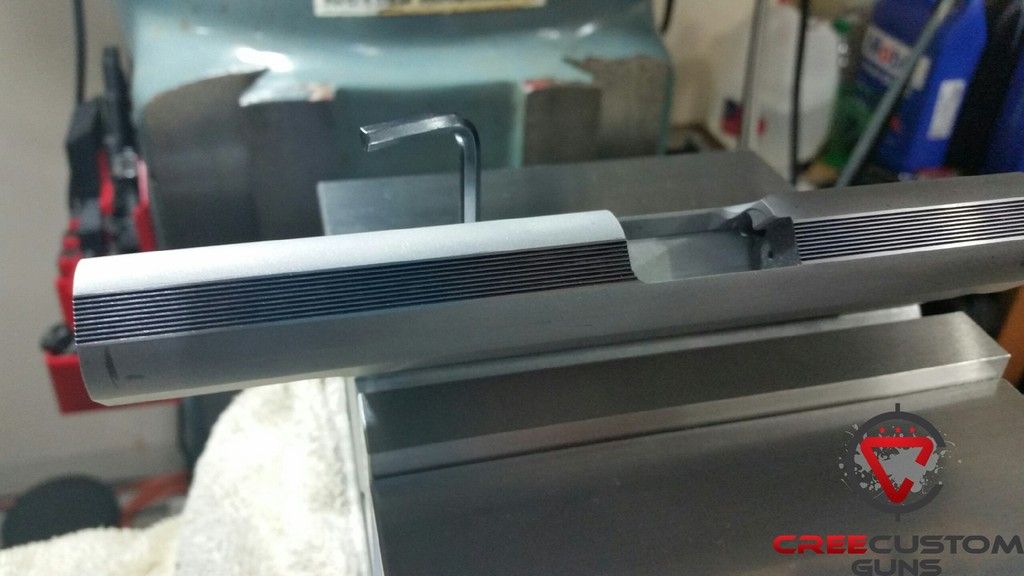
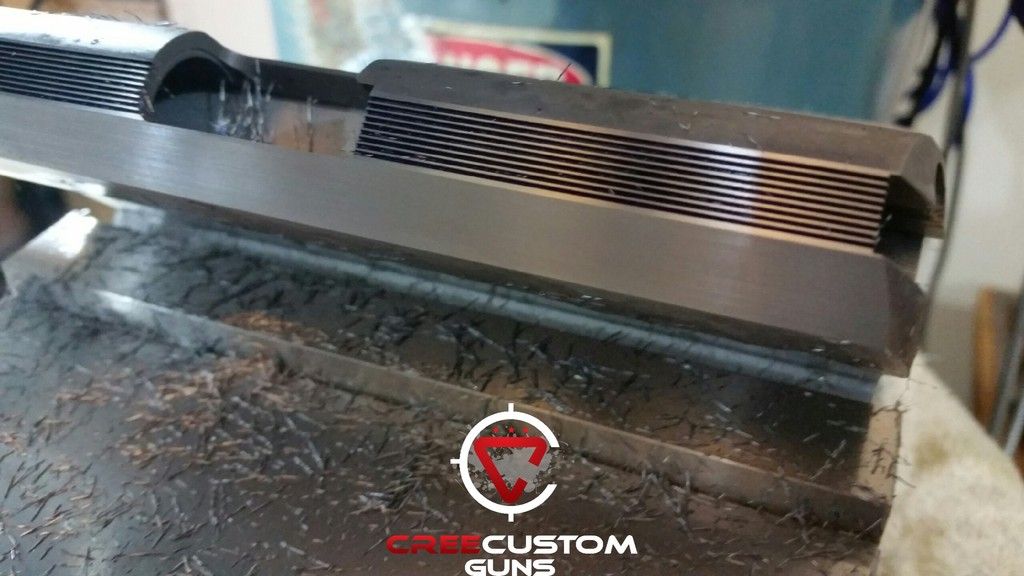
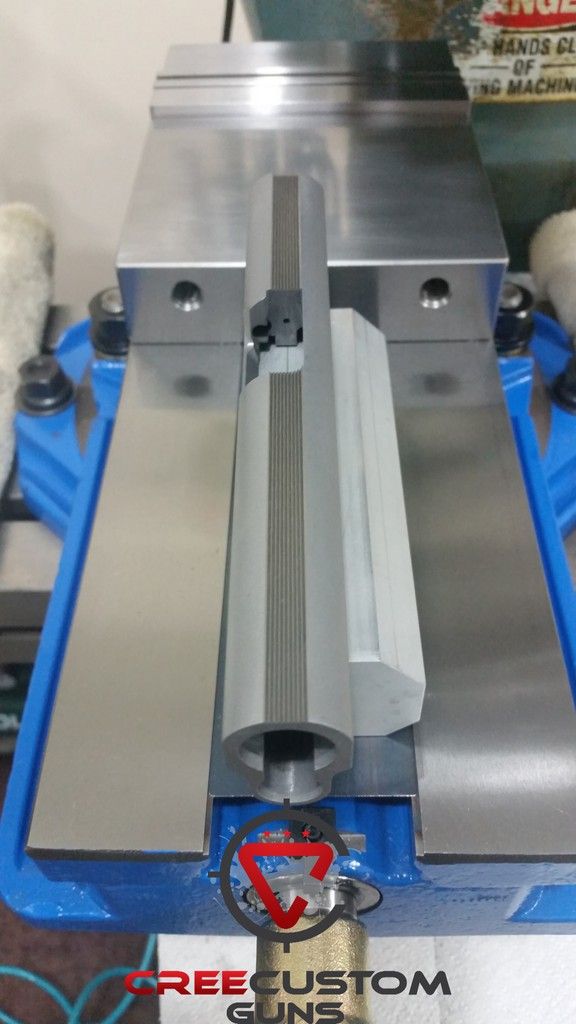
Tri-top is complete...
-
When you say "all the way in" do you mean that it is pushed down into the slide to the point where it cannot be removed with the tool? Also, are you pushing the bolt head inward when you are trying to removed the pin?
As far as soaking parts, WD40 is not going to dissolve carbon buildup or any such material that might be causing the part to stick. I would keep the area well covered in bore solvent for a while and let that go to work on removing the deposits.
Andy
-
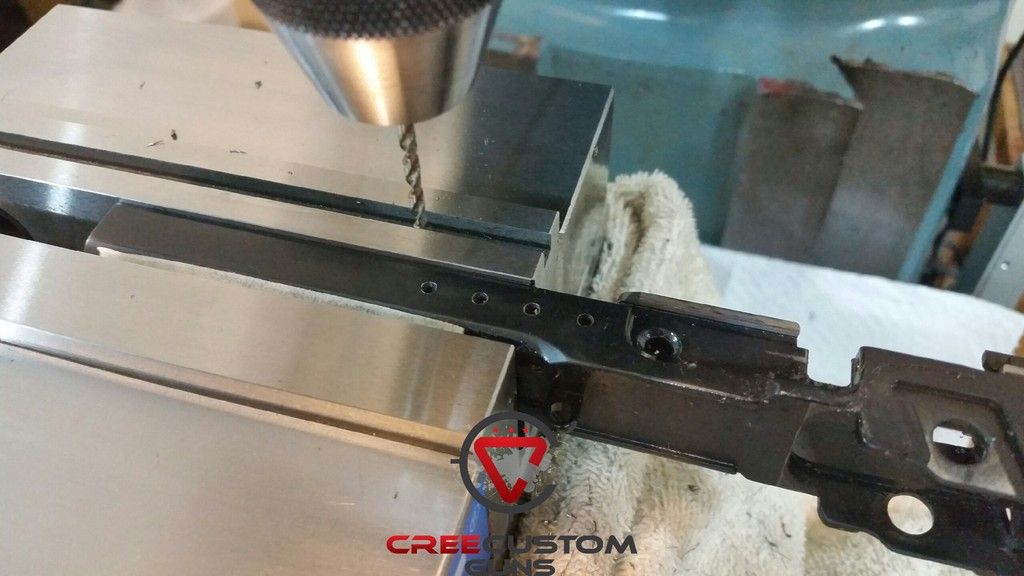
A few pictures of the tri-topping that is in progress. The first picture is getting the slide indicated and positioned properly, the second is taking the first pass and making sure it is even and correctly indicated, the third picture was taken after the last clean-up pass.

-
GB3, How so? What do you think went wrong with installing it?
-
Broncman - really nice design and a lot of work went into that for sure!
-
I am hoping there is some interest in posting your in-progress pics of your full-builds and customizations. I will kick things off.
New build of a 1911 for USPSA Single Stack division. Flat-topped with 30-lpi serrations. Slide will be tri-topped next.

-
Grip fit the frame well, grips screws were tight.
Sent from my SAMSUNG-SM-G900A using Tapatalk -
Grab the frame and slide in one hand, then the grip with the other hand. Then push and pull the grip (a motion like trying to break a stick in half) while watching the back of the grip where it touches the back of the frame. You shouldn't be able to change the gap between the grip
and frame. If you can, the grip
screws are loose or the the grip is is delaminating internally and ruined.
I am following you now, there is no issue with the grip and frame fit with this new 2011 frame.
Sent from my SAMSUNG-SM-G900A using Tapatalk
-
What is the weight of the trigger pull and did you try more pressure on the disconnector.? I suspect bad hammer sear engagement or sear spring grip intereference
Hammer should never fall with any kind of trigger manipulation. With .13 splits hammer can only follow by trigger bounce providing everything in the trigger group is correct. I have 30,000 rounds each on two race guns with 14oz. triggers
never had hammer follow.
Trigger was set at 2.5 pounds, proper sear and hammer hook engagement, etc. Disconnector spring was set a 1 pound.
Sent from my SAMSUNG-SM-G900A using Tapatalk
-
If you don't know how to check the proper grip to frame fit then get it to a gunsmith who does.
I am aware of proper grip to frame fit, but was asking about the "gap test" as you called it.
Sent from my SAMSUNG-SM-G900A using Tapatalk
-
Sounds like the grip is failing. Have you performed the grip movement/gap test?
Could you explain this please?
Sent from my SAMSUNG-SM-G900A using Tapatalk
-
It passes that tests, as well as any other that I know or have every seen. That is what is perplexing about this issue.
-
Have any of you experienced this issue... I have a 2011 in hand that belongs to a shooter who is literally .3 qualification points from being a a GM. He has a 2011 Edge that works well until he really gets on the trigger. Practicing the El Prez with consistent .13 split times, the hammer fell to half-cock several times. Short of those kind of split times, the trigger performed as it should.
Once I had the gun in my hands, I could recreate the problem by riding the trigger a bit while cycling the slide quickly. By "riding the trigger" I mean that I have put some pressure on the trigger, but did not have it pulled all of the way to the rear. While doing this, I could get the hammer to drop to the half-cock notch often.
This gun actually has a bit too much pre-travel for me, but it measures at .048. Hammer hooks have been cut on the mill at 90-degrees and are .019 tall. Sear shows very even. solid contact with both hammer hooks. All parts were polished and prepped. The ignition parts pass every test that I know - it just fails when you ride the trigger a bit.
Any thoughts?
-
Reduction in weight, yes, but "increase in accuracy" is a bit hard to prove.
Andy Cree
-
Reply soon to save some money!!

Gunsmithing In-Progress Pic Thread
in General Gunsmithing
Posted
45-degree chamfer on the bottom of the slide.